MPOWER-YEYO
Forista Legendario
- Modelo
- ///M3
- Registrado
- 20 Dic 2006
- Mensajes
- 12.048
- Reacciones
- 2.834
Os dejo uno tutorial (eso si, en ingles :mus- ) para instalacion de bola de enganche.
Si os animais a comprar ; Schmiedmann - Search - New parts - page 1
It took a week to receive from the time I ordered it, and cost me less than $500 delivered based on exchange rate at the time.
So here it is spread out on the floor... this version does not have the included electrics, but the M3 is not pre-wired anyway so it is better (why pay extra for something you can't use?).The quality of the components was better than I expected, very solid and Germanic precision was evident in every aspect from the welds, to the machining on the tow ball latch mechanism, and quality powder coat (the stuff that looks like scratches it sticker residue I didn't bother to remove). Much better than anything I could have had custom made.

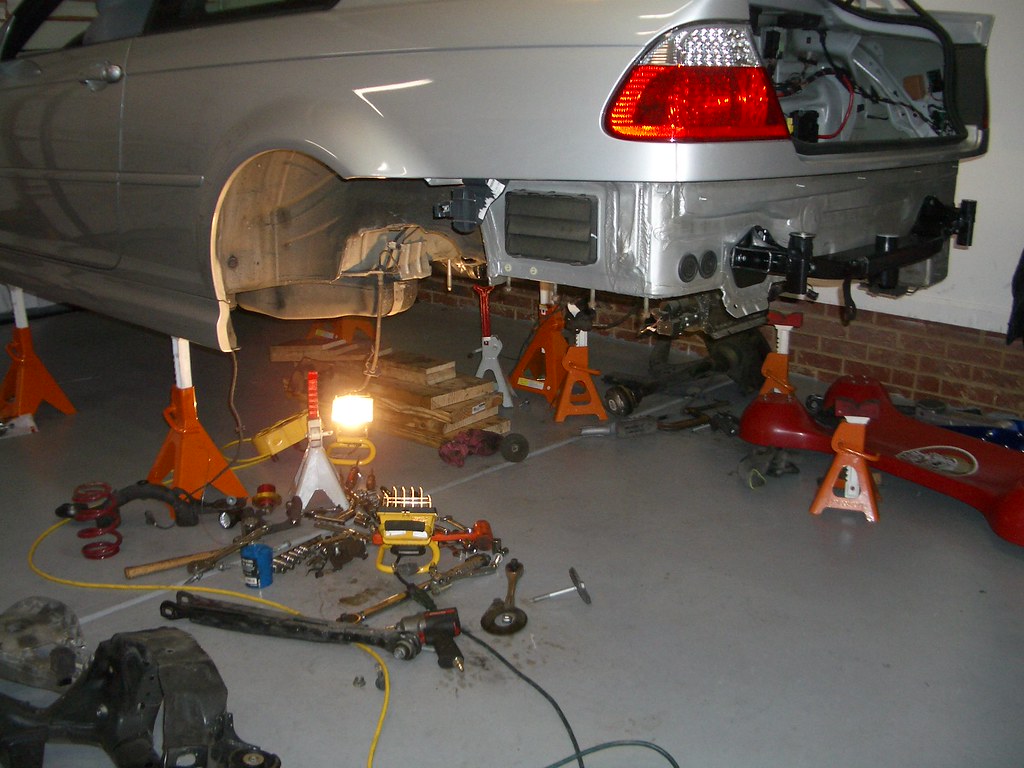
OK, remove the rear bumper: I jacked the car up and removed the wheels to make it easier to work on but this is optional.
Remove the lower valence; remove plastic pop rivets on bottom edge:
Then yank up and out to get it off:
Remove fender liners on both sides:
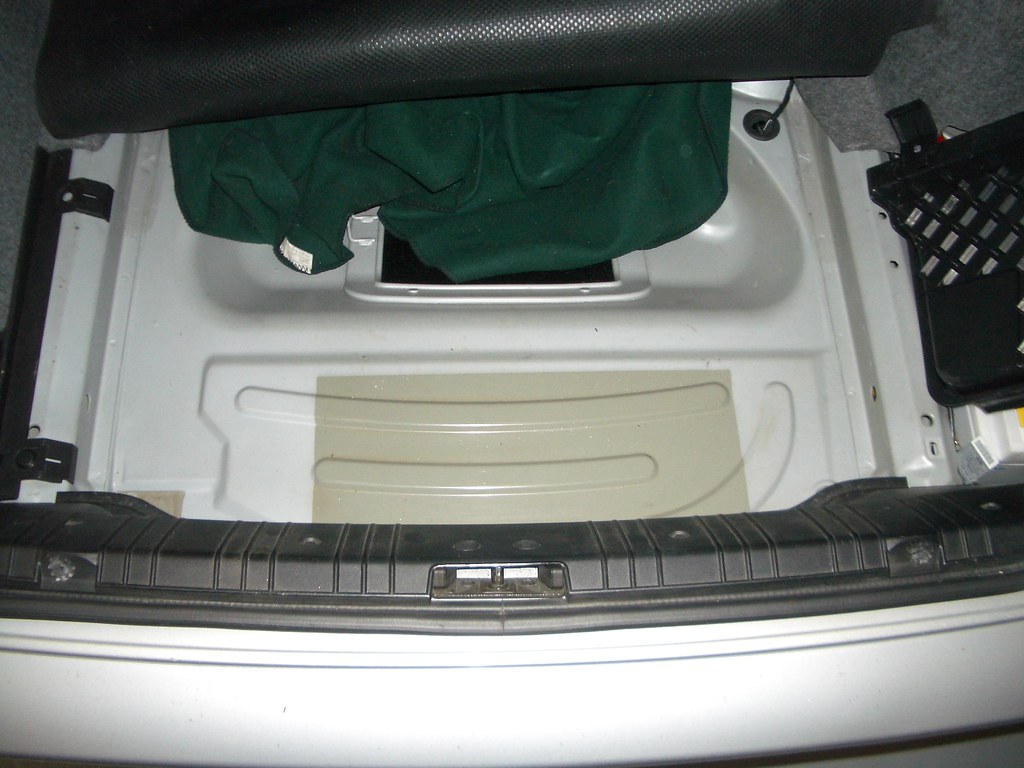
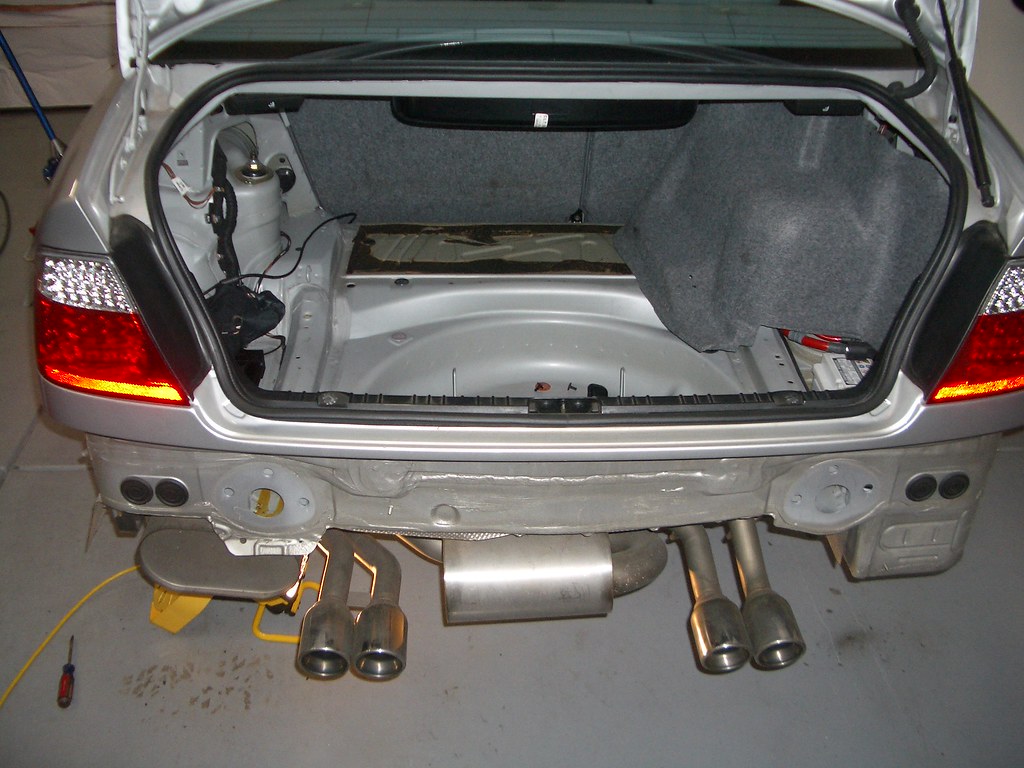
Now gut your trunk if not already done. You will need to take out the floor mat and the side carpets to access the bumper bolts inside.
Remove the 3 13mm nuts on both sides, these are the studs holding the bumper on:
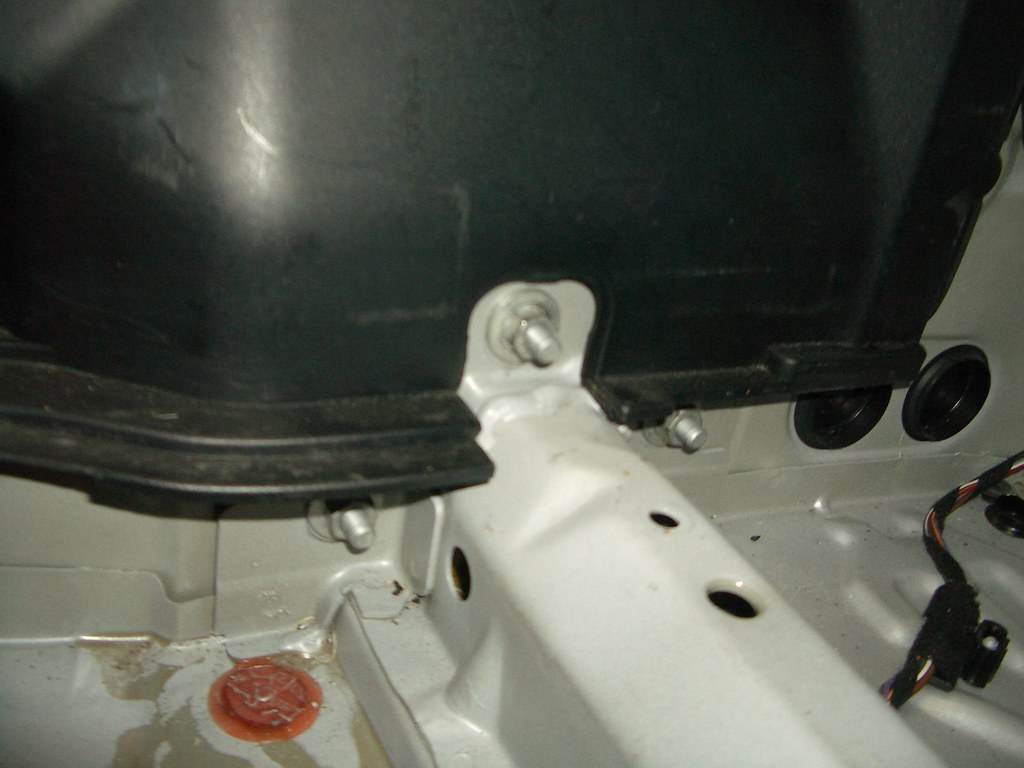

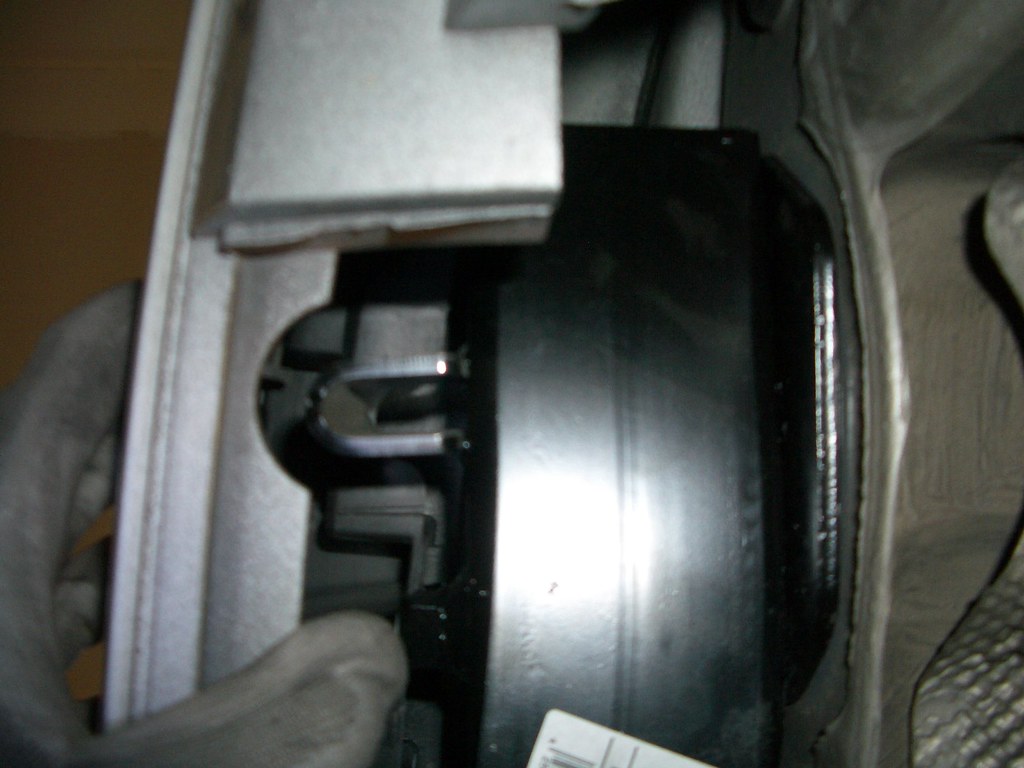
Then pull the bumper off, it is held on with a clip in the inner fender, with a guide on both sides here you can kind of see it, behind the fender liner:
It isn't heavy but it is large and somewhat flimsy, I did it alone but I have a long wingspan... it would be easier with a helper just to make sure you don't drop anything
Quote:
Originally Posted by wilmar13
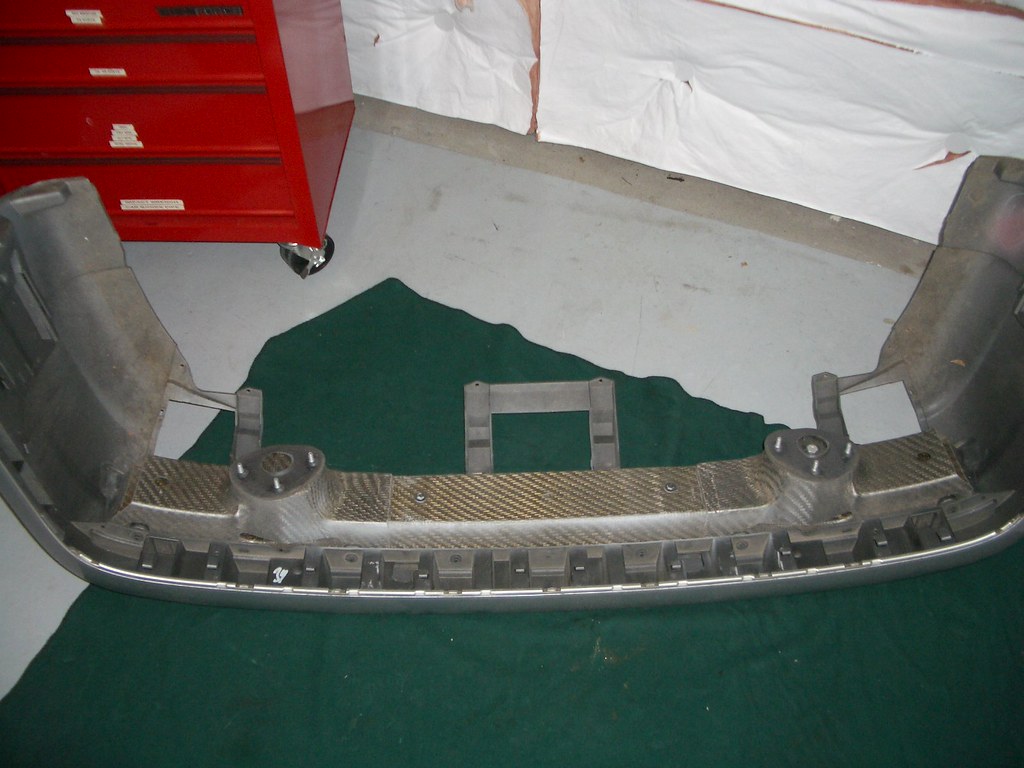
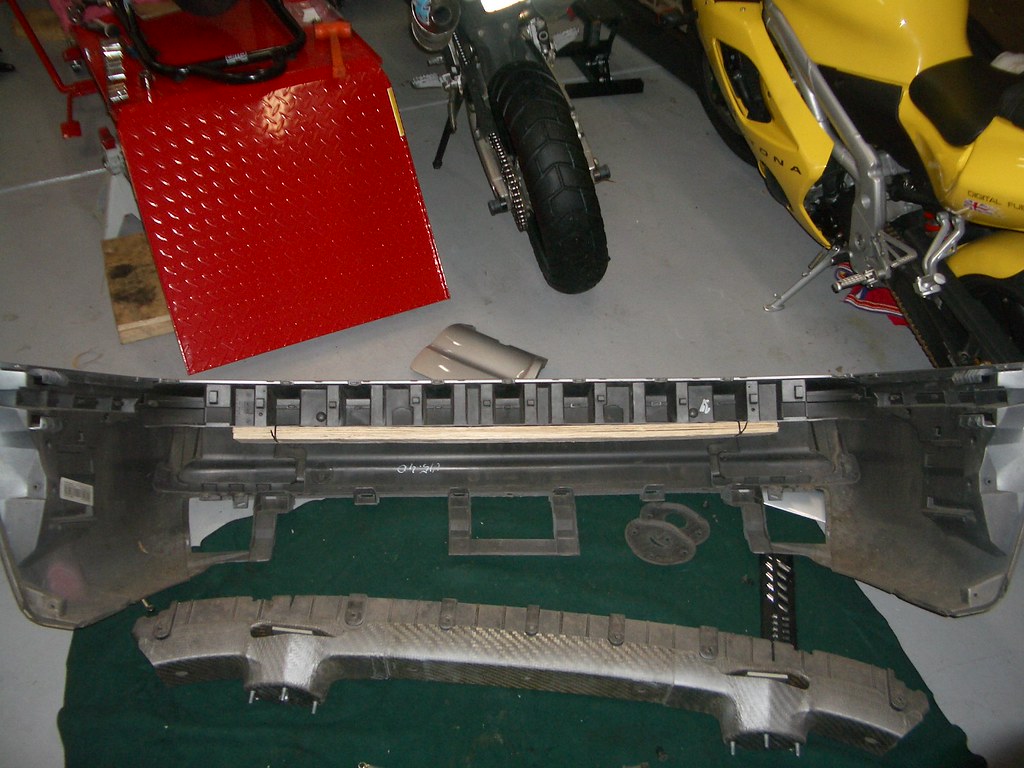
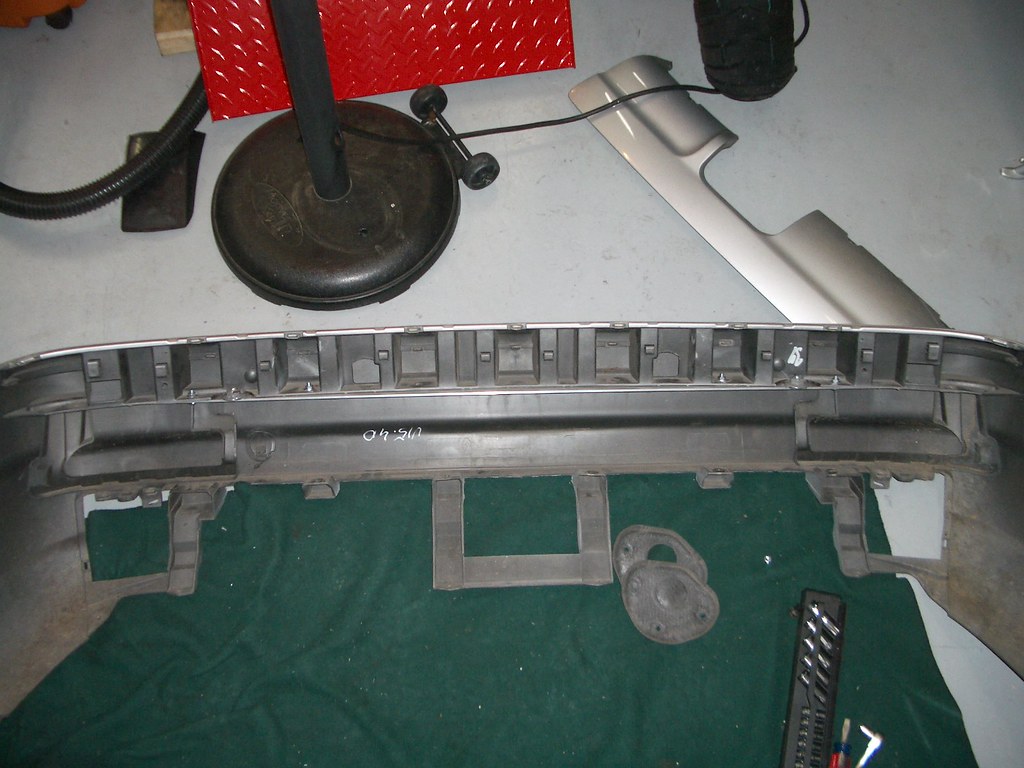
Voila no bumper:
Now put it aside for later:
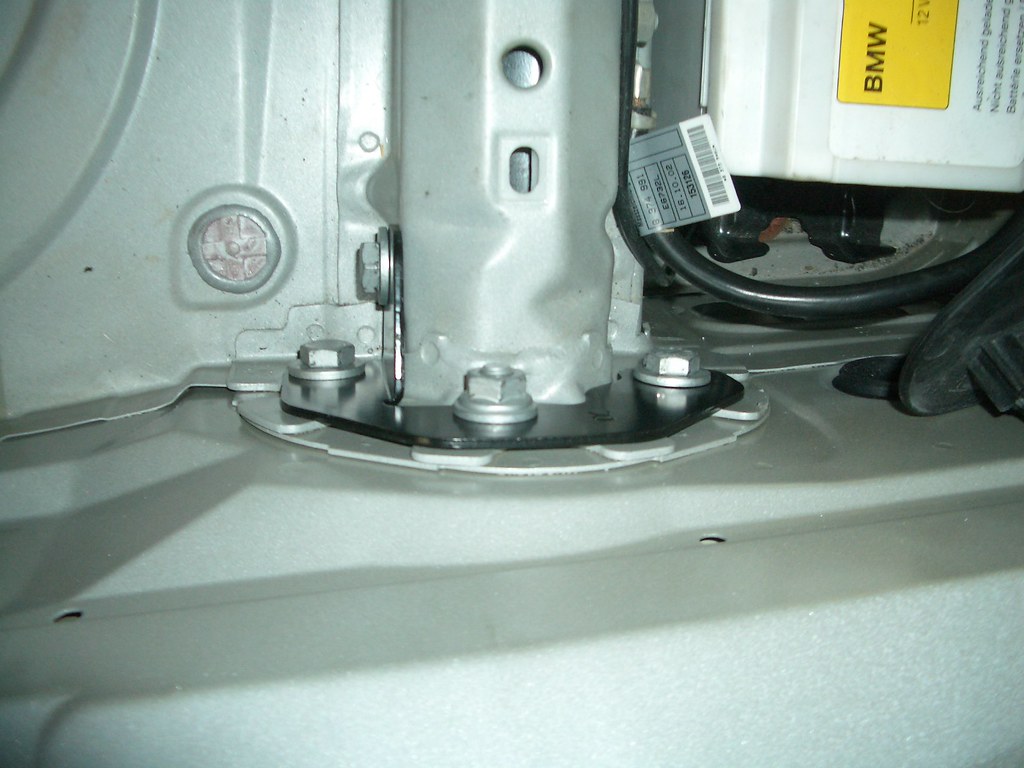
I did end up removing the black plastic liner in the back of the trunk. You will need to do this to install the backing plates used to mount the hitch bar. This is held in my pop rivets, except for these small ones, which are actually screws with plastic caps:

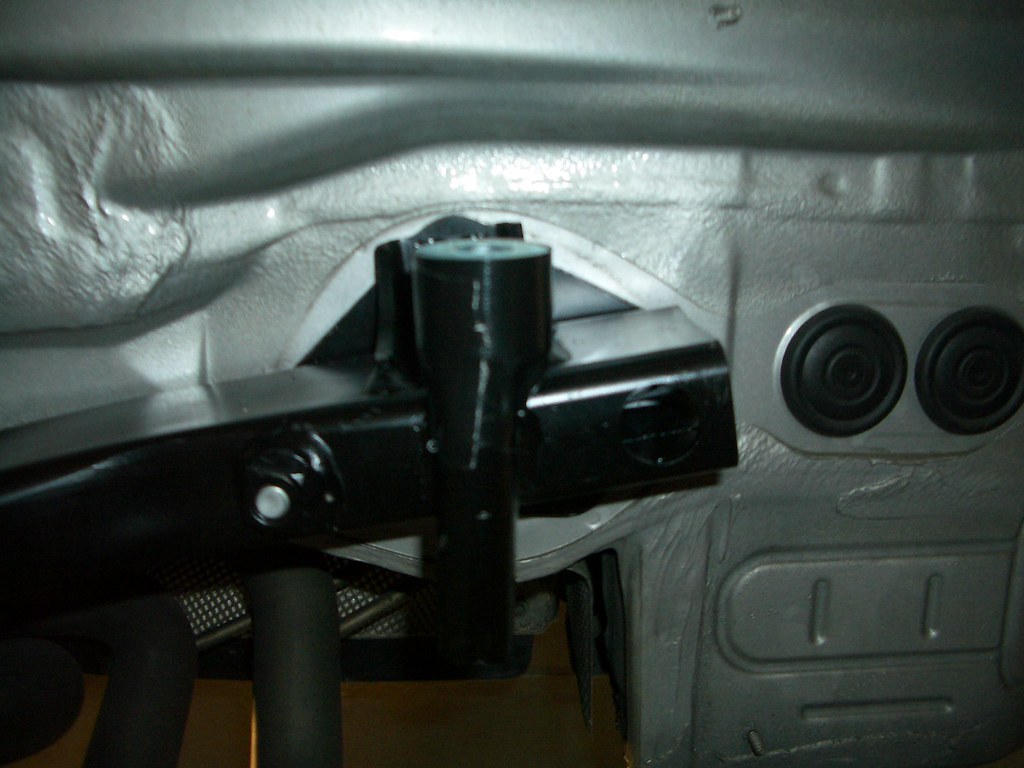
Mounting the hitch is easy, just mount it like the instructions, insert the mounts into where the bumper stops were, then put the backing plate inside and bolt it all together.I don't know if it is obvious how it mounts, but it is an incredibly robust method.and well thought out. Two bolts tie the feet into the frame, then with a retaining spacer inside the three bolts are used tying it all up.
(there is another bolt just out of sight on the top of this pic)
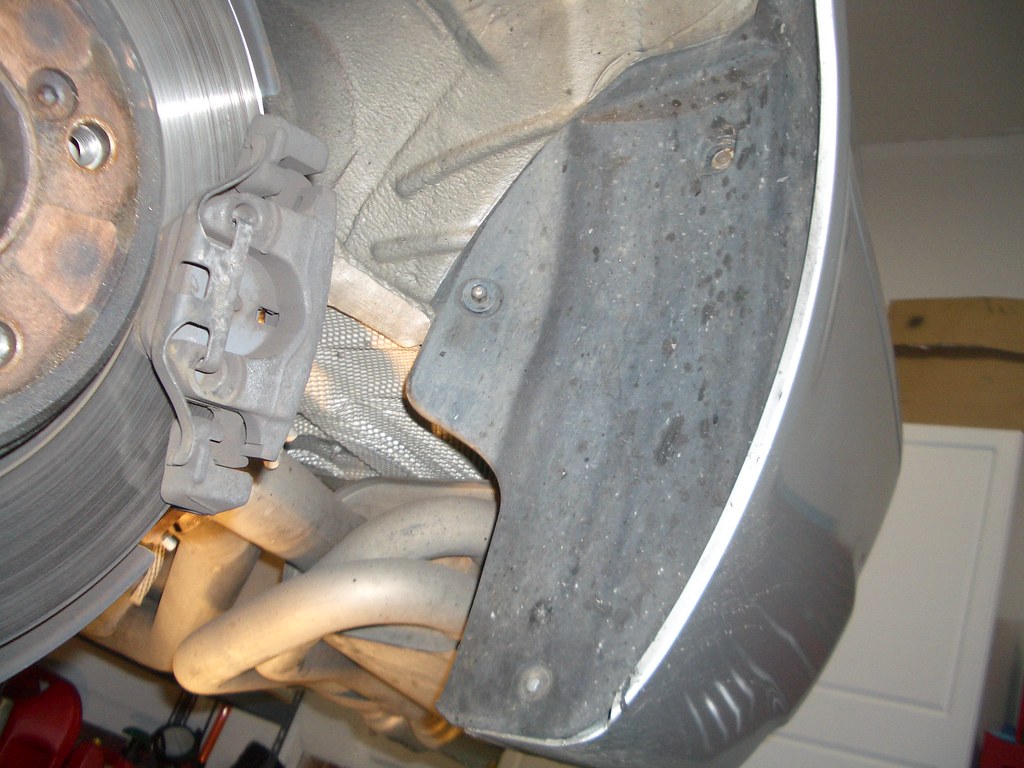
It fits just like as if it was designed by the BMW engineers to pull 3500lb caravans around (oh yeah, it actually was!) and is incredibly beefy... makes the American "drill into sheet metal in the spare tire well" cheap class 1 type hitches used, seem like the flimsy afterthoughts that they are. Oh and no clearance problems with Borla exhaust, and there is even more clearance with the stock exhaust (I have stock on now, after pictures were taken and there is even more room):
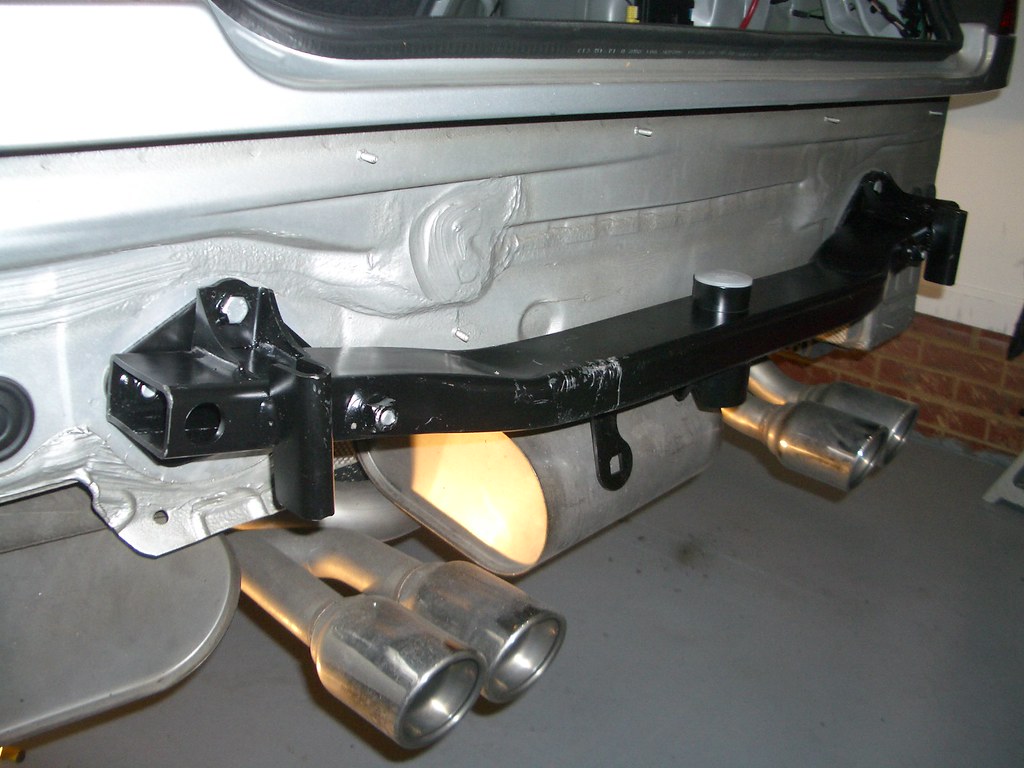
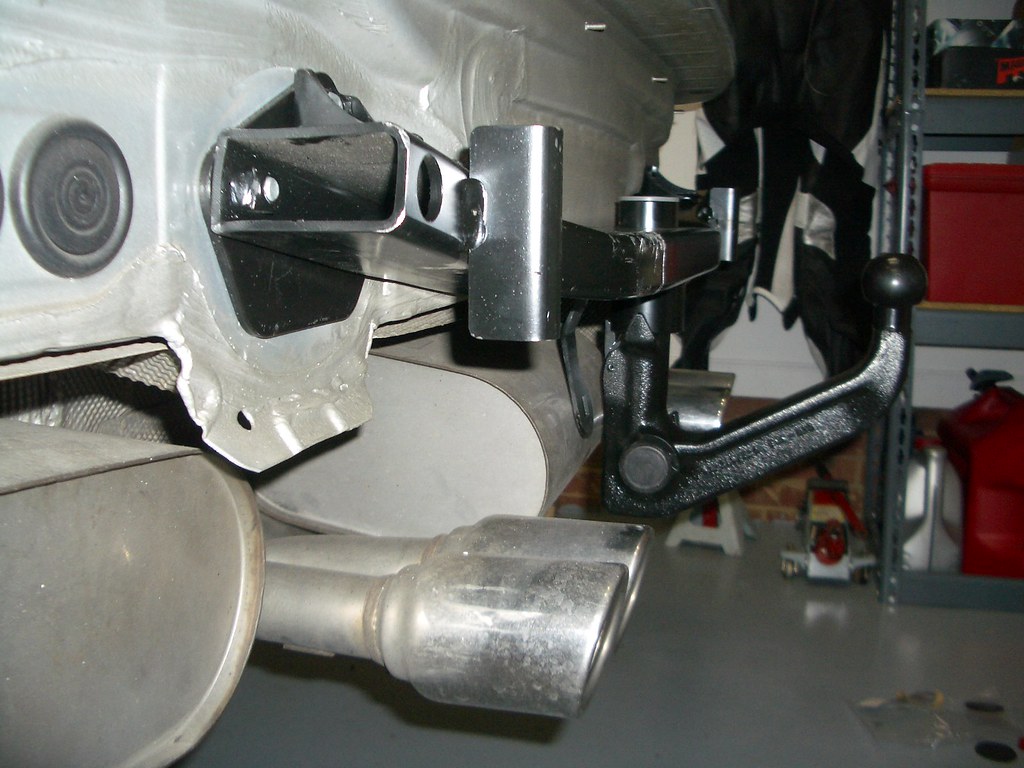
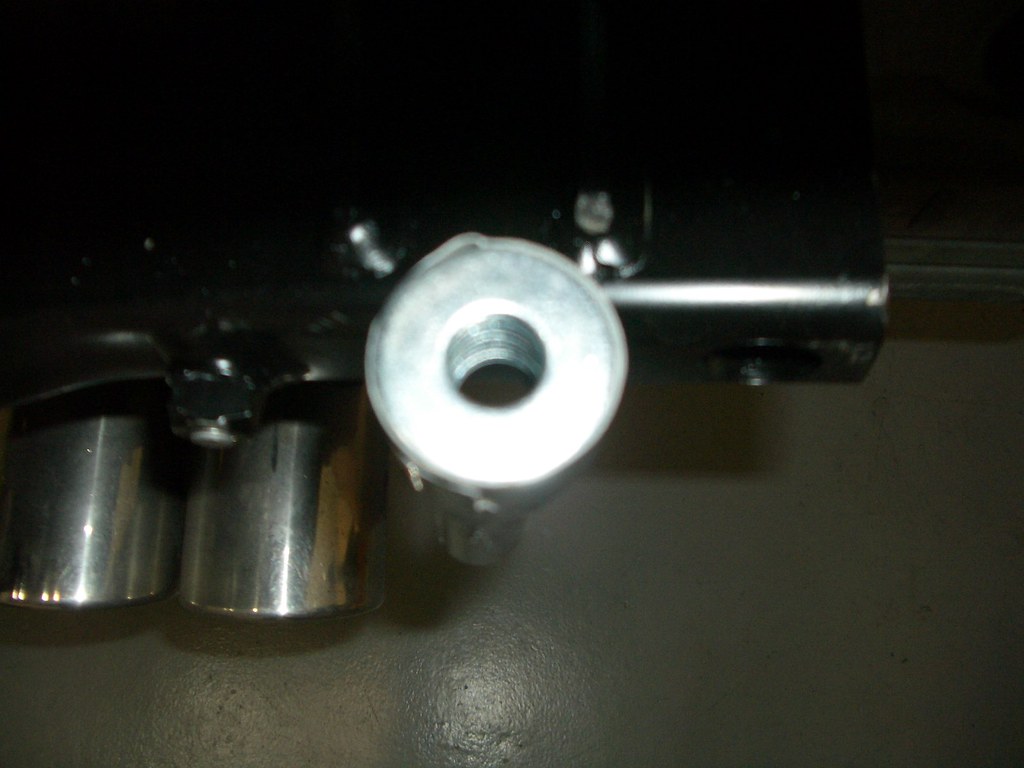
Shown here with ball hitch:

The ball is easily removed and installed.
Even if not used as a trailer hitch it is solid uni-body reinforcement! I mean I was seriously impressed with it, almost seemed like an upgrade like installing a stiff strut bar. LOL I was so pleased with it and surprised at how easy it was to install. And the way the hitch detaches is very solid with a positive detente and lock. But quickly the joy of adding an F150's utility to my M3 was extinguished by the realization I had no idea how I was going to reinstall the bumper. I figured I would cross that bridge when I got there, but now I was standing on the water's edge and needed to build a bridge...
Quote:
Originally Posted by wilmar13
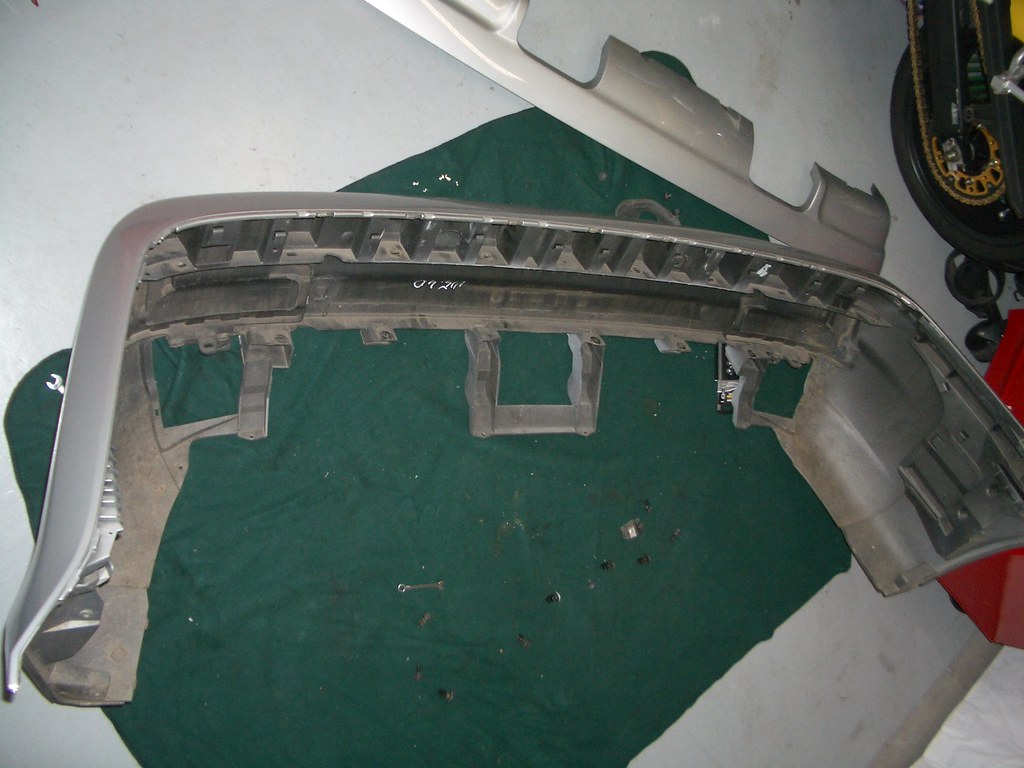
You see the reason this is not compatible with the M3 is the Kevlar bumper beam the car has. The standard E46 has an aluminum one that is somehow compatible I guess (I believe from looking at the schematics, it is shaped so that it will cover the hitch bar). So I test fitted the bumper to see where I had interference. My initial plan was to dremel out clearance where there was interference, but that is just not possible as I could see. Basically the Kevlar beam and bumper shock are trying to vie for the same real estate as the tow hitch, rather than just some interference. I took the bumper shocks and beam out of the bumper cover. I was surprised that they weighed 9lbs with the Styrofoam backing. Doesn't sound like much, but it was significant.

But looking at the bumper cover, it was pretty clear what to do. There are two solid ridges used to mount the bumper beam, so I would just make a beam and mount that beam to the bumper cover and then to the hitch. It is visible here, the upper ridge profiling the bumper cover with oblong holes (used to mount to Kevlar beam). Also if you can make out the two semi-circles in that same ridge, they both happen to coincide EXACTLY where the rear holes are in the hitch bar when the bumper cover is positioned correctly, only the height is off.
Here are the semi-circles used to alignment with hitch bar:

Here is a view from underneath where I have positioned the bumper where I want it and am trying to hold it in place for the photo:
So I got some plywood segments and zip tied them to the bumper to test fit with a known thickness so I could make sure my burgeoning solution would work and adjust for perfect height.
I they were exactly 1" so I installed it and measured my gap, and I happened to need a total about 1.25" of height. Armed with this knowledge and a rough idea of what I wanted I headed off to home depot and picked up a 48"x2"x1/8" aluminum bar with two 5-1/2" 1/2-13 studs and a stack of 1/2" (ID) washers, with two nuts for the studs(and some 1/4-20 x3/4" long bolts, nuts, and washers for mounting beam to cover). I put the bar under the aforementioned ridge and used a sharpie to locate the holes to mount the bumper to my new "beam". I could only get 4 holes to line up because of the curvature of the cover (if you can find a wider bar, and then contour the edges you could get some mounts in the middle, but it was good enough). You need to be precise about this because you will have no adjustment laterally (side to side) since the 1/2 bolts fit snug in the hitch holes. You will have some adjustment front to back however.
So I drilled the holes and then JB welded a washer and nut on the top (you can't reach it to hold it still when you tighten the stud). I put it together on top of the hitch bar to make sure my spacing was good and to align the JB welded nut/washer. Make sure you use sufficient epoxy and let it fully cure as you don't want to spin the nut! It may seem hackish, but the nut is held in compression. You are only using the epoxy to keep nut from turning when you tighten it. It is like spot welding a nut on. The load is on the beam.You can also see the 4, 1/4" mounting holes used to mount to the bumper cover in this pic:

I let it cure for a day while I removed my subframe to install polyurethane bushings and a subframe reinforcement kit (that was WAY harder than the hitch install, BTW!)
I installed the beam into the bumper cover to let it cure, but here you can see how I mounted it. Also I did have to dremel those semi circles to clear the washers I used. It is important that the beam is UNDER the ridge so that the bumper is supported the entire length. If you mount it above it will only be held where the mounting bolts are. 4 bolts are holding the beam to the bumper cover, and then the JB welded nuts are going to be used to bolt it to the hitch bar.
I used a stack of washers to get my remaining height. They were about .080" thick, so I ended up using 1/64" (.015") shims to get the height perfect. I didn't have a precision way to measure, but basically you test fit and remove/add washers as needed until you are satisfied. I am anal so I used the 1/64" shims, but it was really close with just 1/2" washers anyway. I wrapped the washer stack for height with gorillia tape to make mounting the bumper cover easy without pushing them off. Also I found it is easiest to wrap/stack more than you need and then just razor then off one by one. No tape on the mounting surface and much better than cursing as you drop them over and over. It is hard to tell because of the blurriness and color, but that is my washer stack taped to the hitch.
top view of same thing:
So now you are all set. Slide the bumper cover back on and use your 5-1/2" stud up through the bottom to bolt down the cover (into the nut) and torque it down.
Quote:
Originally Posted by wilmar13
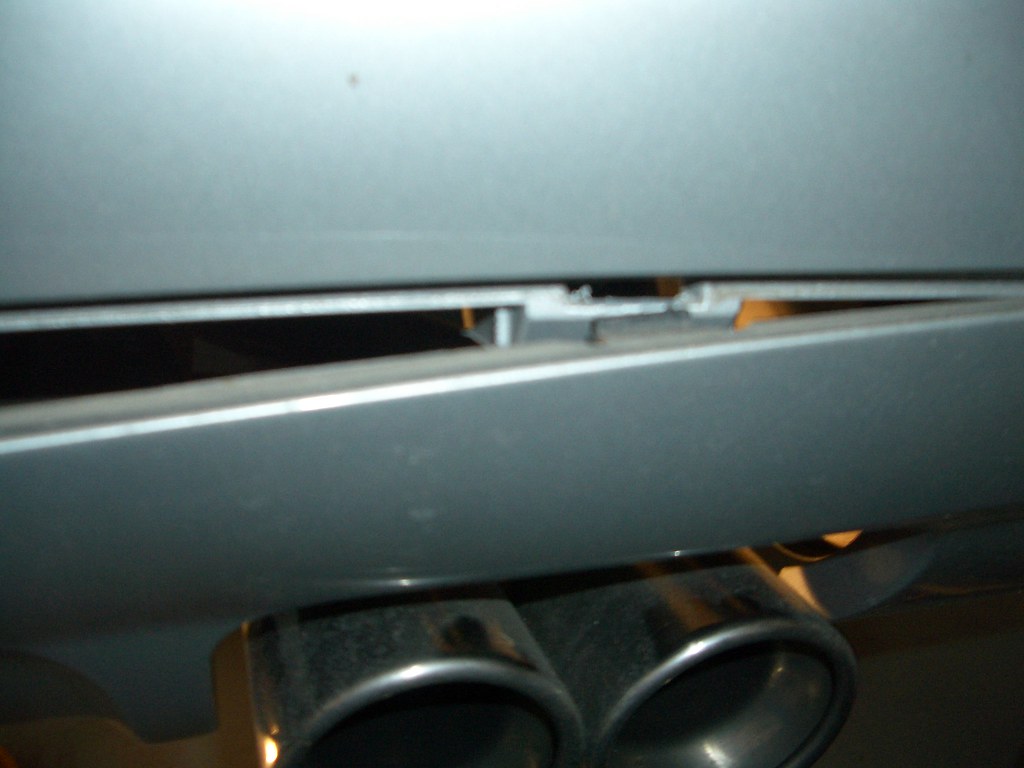
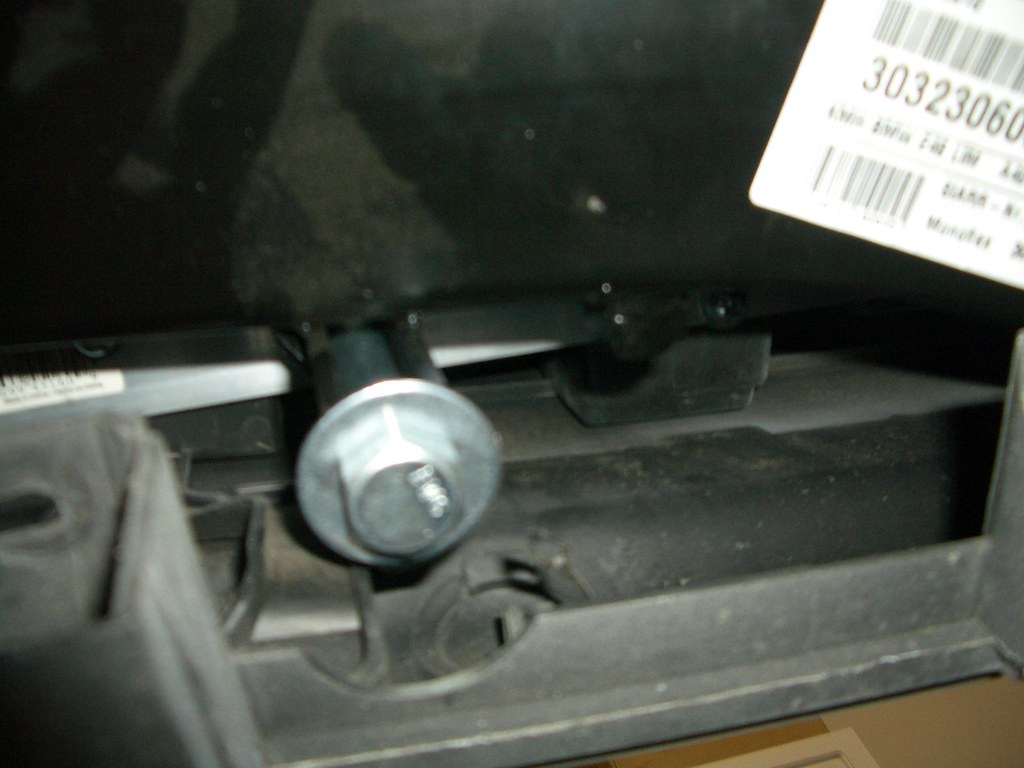
Bam its done (well almost). Here is a view of the cover bolted down and the ball hitch inserted:
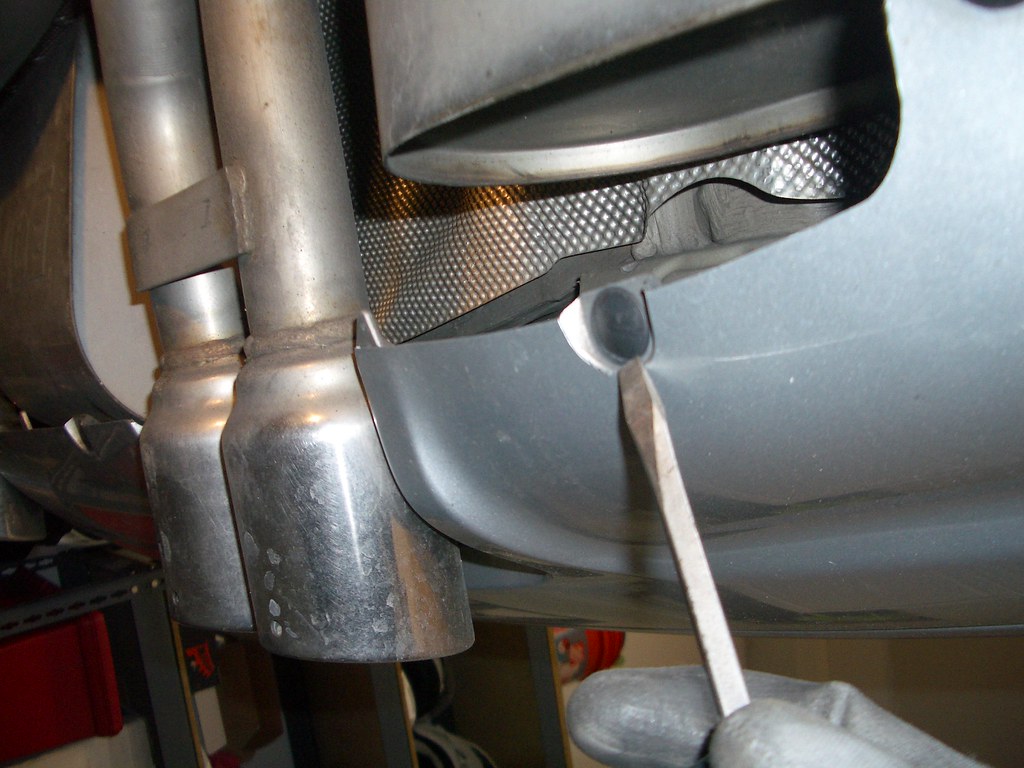
Another view of the ball hitch and lock from below: The red end shaft is actually the key, you turn the knob to release the ball (when it is unlocked).

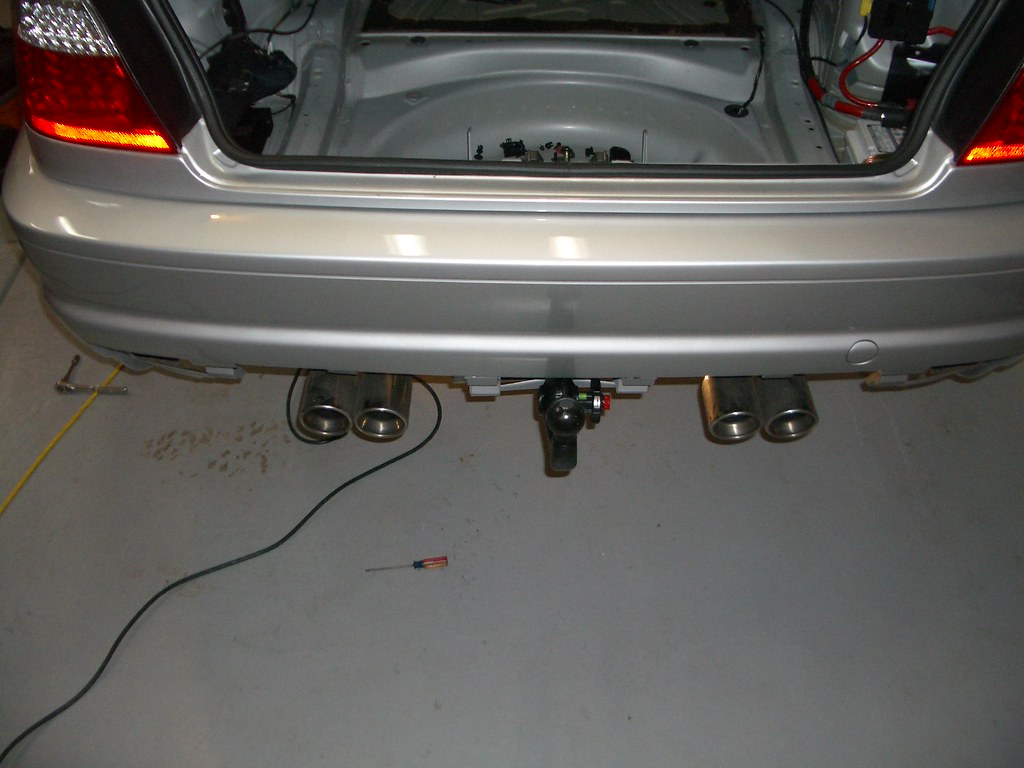
It rests against the lower valence mount slightly, but I am going to leave it untrimmed. You will have to cut out a small clearance in the lower diffuser, for the ball hitch, but that will be easy. I have not done so to mine, because I don't have a trailer yet, but now I can start looking! The cover is mounted solid to the bumper by directly bolting it, and results in perfect alignment with the same ability to adjust fore/aft on the sides as it did before. I was really pleased with how it turned out, and surprised at how simple it was to figure out a solution. With the ball hitch removed it is completely hidden.
Because I am a weight weenie, I did weigh everything.
weights:
Main bar: 19lbs
Donkey Dong: 11lbs
Rail mounts and brackets: 5lbs
Aluminum bar and added hardware: 2lbs
Bumper shocks and Kevlar rail with Styrofoam filler (minus) 9lbs
So in the end the hitch weighs 35lbs complete and my mounting solution is another 2lbs. Since you remove 9 lbs of the stock bumper beam, and remove the ball hitch it is only 17lbs of added weight when not in use. But it is in the rear, and it actually does add some rigidity to the body. I don't know if it makes much difference but all in all, it is very little weight added for the increased utility it brings. The hitch is rated for 165lbs tongue and 5900lbs braked towing capacity. I will never be anywhere near that, but it is nice to know I won't be needing to park a truck in the driveway after all.
Si os animais a comprar ; Schmiedmann - Search - New parts - page 1
It took a week to receive from the time I ordered it, and cost me less than $500 delivered based on exchange rate at the time.
So here it is spread out on the floor... this version does not have the included electrics, but the M3 is not pre-wired anyway so it is better (why pay extra for something you can't use?).The quality of the components was better than I expected, very solid and Germanic precision was evident in every aspect from the welds, to the machining on the tow ball latch mechanism, and quality powder coat (the stuff that looks like scratches it sticker residue I didn't bother to remove). Much better than anything I could have had custom made.
OK, remove the rear bumper: I jacked the car up and removed the wheels to make it easier to work on but this is optional.
Remove the lower valence; remove plastic pop rivets on bottom edge:
Then yank up and out to get it off:
Remove fender liners on both sides:
Now gut your trunk if not already done. You will need to take out the floor mat and the side carpets to access the bumper bolts inside.
Remove the 3 13mm nuts on both sides, these are the studs holding the bumper on:
Then pull the bumper off, it is held on with a clip in the inner fender, with a guide on both sides here you can kind of see it, behind the fender liner:
It isn't heavy but it is large and somewhat flimsy, I did it alone but I have a long wingspan... it would be easier with a helper just to make sure you don't drop anything
Quote:
Originally Posted by wilmar13
Voila no bumper:
Now put it aside for later:
I did end up removing the black plastic liner in the back of the trunk. You will need to do this to install the backing plates used to mount the hitch bar. This is held in my pop rivets, except for these small ones, which are actually screws with plastic caps:
Mounting the hitch is easy, just mount it like the instructions, insert the mounts into where the bumper stops were, then put the backing plate inside and bolt it all together.I don't know if it is obvious how it mounts, but it is an incredibly robust method.and well thought out. Two bolts tie the feet into the frame, then with a retaining spacer inside the three bolts are used tying it all up.
(there is another bolt just out of sight on the top of this pic)
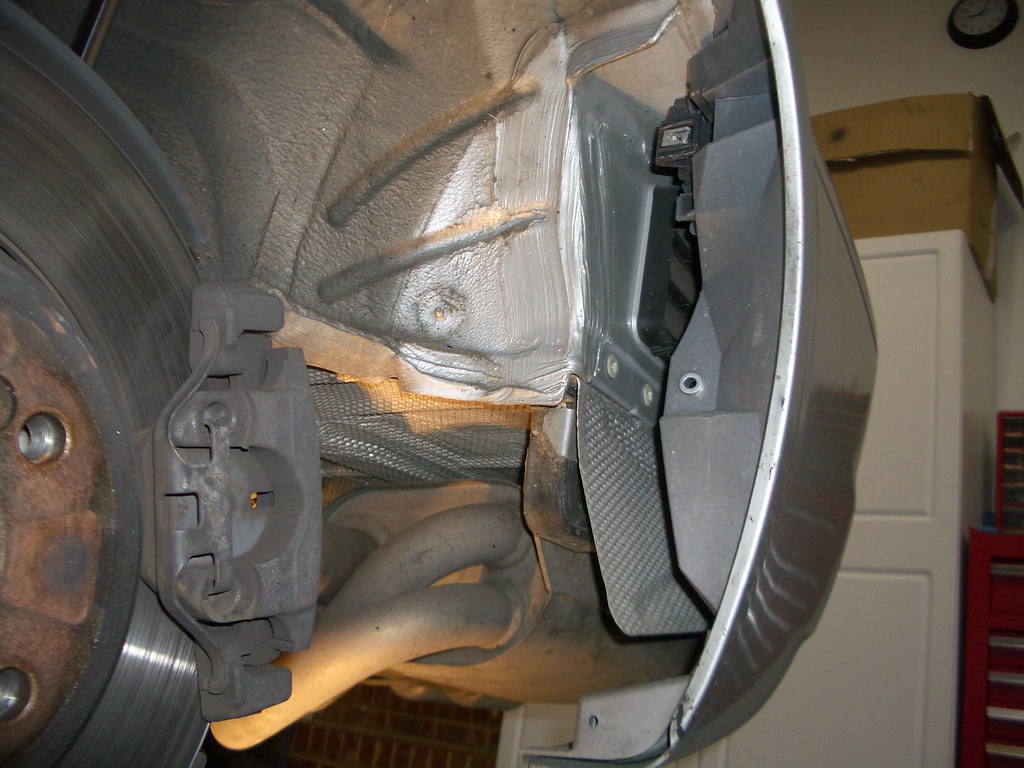
It fits just like as if it was designed by the BMW engineers to pull 3500lb caravans around (oh yeah, it actually was!) and is incredibly beefy... makes the American "drill into sheet metal in the spare tire well" cheap class 1 type hitches used, seem like the flimsy afterthoughts that they are. Oh and no clearance problems with Borla exhaust, and there is even more clearance with the stock exhaust (I have stock on now, after pictures were taken and there is even more room):
Shown here with ball hitch:
The ball is easily removed and installed.
Even if not used as a trailer hitch it is solid uni-body reinforcement! I mean I was seriously impressed with it, almost seemed like an upgrade like installing a stiff strut bar. LOL I was so pleased with it and surprised at how easy it was to install. And the way the hitch detaches is very solid with a positive detente and lock. But quickly the joy of adding an F150's utility to my M3 was extinguished by the realization I had no idea how I was going to reinstall the bumper. I figured I would cross that bridge when I got there, but now I was standing on the water's edge and needed to build a bridge...
Quote:
Originally Posted by wilmar13
You see the reason this is not compatible with the M3 is the Kevlar bumper beam the car has. The standard E46 has an aluminum one that is somehow compatible I guess (I believe from looking at the schematics, it is shaped so that it will cover the hitch bar). So I test fitted the bumper to see where I had interference. My initial plan was to dremel out clearance where there was interference, but that is just not possible as I could see. Basically the Kevlar beam and bumper shock are trying to vie for the same real estate as the tow hitch, rather than just some interference. I took the bumper shocks and beam out of the bumper cover. I was surprised that they weighed 9lbs with the Styrofoam backing. Doesn't sound like much, but it was significant.
But looking at the bumper cover, it was pretty clear what to do. There are two solid ridges used to mount the bumper beam, so I would just make a beam and mount that beam to the bumper cover and then to the hitch. It is visible here, the upper ridge profiling the bumper cover with oblong holes (used to mount to Kevlar beam). Also if you can make out the two semi-circles in that same ridge, they both happen to coincide EXACTLY where the rear holes are in the hitch bar when the bumper cover is positioned correctly, only the height is off.
Here are the semi-circles used to alignment with hitch bar:
Here is a view from underneath where I have positioned the bumper where I want it and am trying to hold it in place for the photo:
So I got some plywood segments and zip tied them to the bumper to test fit with a known thickness so I could make sure my burgeoning solution would work and adjust for perfect height.
I they were exactly 1" so I installed it and measured my gap, and I happened to need a total about 1.25" of height. Armed with this knowledge and a rough idea of what I wanted I headed off to home depot and picked up a 48"x2"x1/8" aluminum bar with two 5-1/2" 1/2-13 studs and a stack of 1/2" (ID) washers, with two nuts for the studs(and some 1/4-20 x3/4" long bolts, nuts, and washers for mounting beam to cover). I put the bar under the aforementioned ridge and used a sharpie to locate the holes to mount the bumper to my new "beam". I could only get 4 holes to line up because of the curvature of the cover (if you can find a wider bar, and then contour the edges you could get some mounts in the middle, but it was good enough). You need to be precise about this because you will have no adjustment laterally (side to side) since the 1/2 bolts fit snug in the hitch holes. You will have some adjustment front to back however.
So I drilled the holes and then JB welded a washer and nut on the top (you can't reach it to hold it still when you tighten the stud). I put it together on top of the hitch bar to make sure my spacing was good and to align the JB welded nut/washer. Make sure you use sufficient epoxy and let it fully cure as you don't want to spin the nut! It may seem hackish, but the nut is held in compression. You are only using the epoxy to keep nut from turning when you tighten it. It is like spot welding a nut on. The load is on the beam.You can also see the 4, 1/4" mounting holes used to mount to the bumper cover in this pic:
I let it cure for a day while I removed my subframe to install polyurethane bushings and a subframe reinforcement kit (that was WAY harder than the hitch install, BTW!)
I installed the beam into the bumper cover to let it cure, but here you can see how I mounted it. Also I did have to dremel those semi circles to clear the washers I used. It is important that the beam is UNDER the ridge so that the bumper is supported the entire length. If you mount it above it will only be held where the mounting bolts are. 4 bolts are holding the beam to the bumper cover, and then the JB welded nuts are going to be used to bolt it to the hitch bar.
I used a stack of washers to get my remaining height. They were about .080" thick, so I ended up using 1/64" (.015") shims to get the height perfect. I didn't have a precision way to measure, but basically you test fit and remove/add washers as needed until you are satisfied. I am anal so I used the 1/64" shims, but it was really close with just 1/2" washers anyway. I wrapped the washer stack for height with gorillia tape to make mounting the bumper cover easy without pushing them off. Also I found it is easiest to wrap/stack more than you need and then just razor then off one by one. No tape on the mounting surface and much better than cursing as you drop them over and over. It is hard to tell because of the blurriness and color, but that is my washer stack taped to the hitch.
top view of same thing:
So now you are all set. Slide the bumper cover back on and use your 5-1/2" stud up through the bottom to bolt down the cover (into the nut) and torque it down.
Quote:
Originally Posted by wilmar13
Bam its done (well almost). Here is a view of the cover bolted down and the ball hitch inserted:
Another view of the ball hitch and lock from below: The red end shaft is actually the key, you turn the knob to release the ball (when it is unlocked).
It rests against the lower valence mount slightly, but I am going to leave it untrimmed. You will have to cut out a small clearance in the lower diffuser, for the ball hitch, but that will be easy. I have not done so to mine, because I don't have a trailer yet, but now I can start looking! The cover is mounted solid to the bumper by directly bolting it, and results in perfect alignment with the same ability to adjust fore/aft on the sides as it did before. I was really pleased with how it turned out, and surprised at how simple it was to figure out a solution. With the ball hitch removed it is completely hidden.
Because I am a weight weenie, I did weigh everything.
weights:
Main bar: 19lbs
Donkey Dong: 11lbs
Rail mounts and brackets: 5lbs
Aluminum bar and added hardware: 2lbs
Bumper shocks and Kevlar rail with Styrofoam filler (minus) 9lbs
So in the end the hitch weighs 35lbs complete and my mounting solution is another 2lbs. Since you remove 9 lbs of the stock bumper beam, and remove the ball hitch it is only 17lbs of added weight when not in use. But it is in the rear, and it actually does add some rigidity to the body. I don't know if it makes much difference but all in all, it is very little weight added for the increased utility it brings. The hitch is rated for 165lbs tongue and 5900lbs braked towing capacity. I will never be anywhere near that, but it is nice to know I won't be needing to park a truck in the driveway after all.
